Seitan Cooking School!


1 1/2 cups Vital Wheat Gluten
2 tablespoons nutritional yeast
1 teaspoon sumac*
1 teaspoon thyme
1/2 teaspoon black pepper
3 tablespoons soy sauce
water
Making great seitan is all about the technique you use when kneading and forming the gluten. All you really need to make seitan is vital wheat gluten and enough liquid to moisten it, and you can adjust the spices and types of liquid to your taste. This recipe merely reflects my favorite way to flavor it, but you should experiment on your own.
*A note about sumac: Sumac is my favorite spice. It makes anything savory, and has a mild citrus taste. You can order sumac online, but you can find it cheap at any Middle Eastern market. (I got a pound of sumac for $4 that way.) It is commonly used to make zataar, a spice mix consisting of sumac, thyme and sea salt; this seitan recipe borrows the taste of zataar for its savory and complex flavor.
Basic Gluten Prep:
In a medium-sized bowl, mix together dry ingredients. Add the soy sauce, but try to not pour it all in one place or you may end up with lots of soy sauce in one part of the gluten and none anywhere else. I swirl the bottle around in a circle as I pour. Add water in a steady stream and stir as you do so, adding only enough water to just moisten all of the flour mixture. The gluten should glob together as it absorbs water. Knead it a little in the bowl just to make sure that there aren't any dry parts, form it into an oblong shape, and let it rest on a cutting board or clean countertop for 15 minutes.
There are several ways to cook this stuff. Here are my favorites:
Boiling method (the hardest method):
While the gluten rests, bust out your largest pot, fill it 3/4 with water, and set it on the stove to boil.
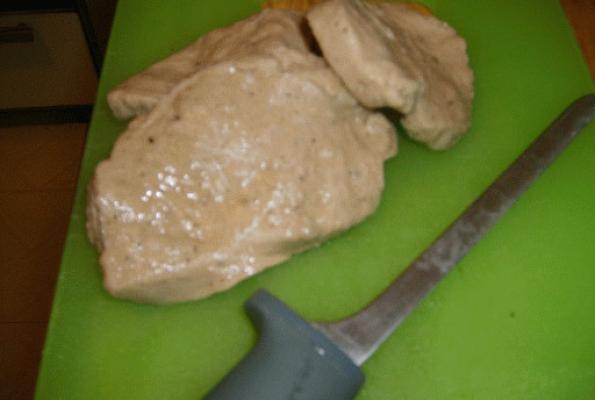
Once 15 minutes has elapsed, you're ready to form your gluten. Most recipes have you break it up into a few pieces and drop it into simmering water, but that results in a dense interior and a spongy exterior. To avoid this, take one end of your gluten loaf and start to stretch it out. Youll find that you can make it membrane-thin, thin enough that you can see light through it. As you stretch it out, start to roll it up a little bit at a time. Once you've rolled a little bit of it, you can start stretching it out at the sides (remember, you're just working on one end of the gluten) and wrapping them over the rolled part. This is making textured layers of gluten that will have a cooked consistency similar to chicken. Keep rolling, stretching, and wrapping until you've got a ball forming at the end of the piece of gluten. When it gets to be about the size of your fist or a bit smaller than that, cut it from the remaining gluten with a good, sharp knife. Stretch out the unworked end and wrap it around the ball of gluten, effectively sealing off the ball with a smooth outside layer. Put the ball aside and do the same with the rest of the gluten.
Gently place the balls of gluten in the pot when the water is almost boiling (small bubbles rising but no rolling action at the surface). They will sink to the bottom. DO NOT let that water boil! Keep it at that almost boiling state for the duration of cooking. If the balls of gluten are still at the bottom of the pot after about 15 minutes, gently nudge them to see if they're sticking to the pot; if so, carefully detach them and they will probably rise to the surface. Once they rise, cover the pot, but monitor it carefully for a few minutes to make sure that the water doesn't boil. So your gluten rose to the surface and the water hasn't boiled? Whew! Now all you have to do is turn the gluten over once every 30 minutes or thereabouts and let it simmer for about 1 1/2 hours. After the time has elapsed, turn off the heat and let the whole thing sit until the gluten sinks again. Then you can take it out and store it in some of the broth for about a week, or slice it thin with a mandolin and use it as lunch meat.
When you go to cook the stuff, peel pieces from the ball with your fingers, kind of like fresh mozzarella. You can just slice it, but peeling it like that really preserves the texture.
Baking method:
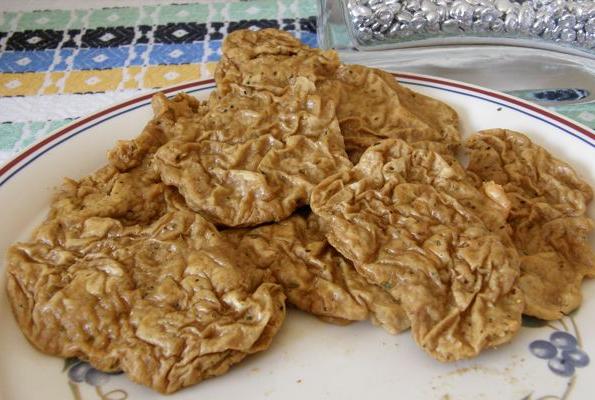
Oil up a cookie sheet and preheat the oven to about 375. After the gluten has rested, take the entire piece and start stretching it lengthwise and folding it in half. Do that about 5-7 times, or until you see it start to have some real texture. Form it into a flat oblong shape and press it down on a cutting board. While pressing it down with one hand, take a sharp knife in your other hand and start cutting thin slices. Place slices on the cookie sheet and brush some more oil on them. Pop them in the oven for about 10 minutes. Theyll puff up pretty huge, and more so if you let the edges touch a little bit (if so, place them in rows with spaces between the rows but not between the pieces that make up the rows, dig?) Turn them over and put them back in for about 2-3 minutes. The outside should be slightly browned and crispy while the inside will be moist and meaty. You can brush some sauce (BBQ or whatever) on them when you flip them or once they're out of the oven.
Deep frying method (the easiest and most fattening):
Pour an inch or so of oil into a saucepan and heat it on medium high, making sure that it doesn't start burning. After the gluten has rested for 15 minutes, stretch it out until you get that membrane-like texture. (That sounds gross, doesn't it? It really is the best way to describe it, though.) Start tearing off pieces from the end (use your own judgment on size, and don’t try to make them even) and drop them in the oil. Theyll puff up in the oil. Make sure they don't stick to the bottom, and flip them when the bottom starts to brown. Place fried seitan on a dish covered with paper towels to drain excess oil. The taste and texture of this reminds me of fried chicken.
SO HOW'D IT GO?
I would love to see a video of how you knead it. The top of mine is smooth while the botton is bumpy.
;)b I followed the texturing recipe for seitan and found it to be a perfect technique for giving it a firmer, less spongy texture. I plann on altering how this process is used and attempt to make it a bit less arduous.
Thanks for the advice. I am a fan.
Larry
I've made seitan before, but this is so easy and the instructions are perfectly clear and it made making the seitan a breeze. I baked them and then brushed on BBQ sauce. Yum! I didn't have any sumac so I subbed basil and garlic mix along with thyme and pepper. The possible flavor combinations are limitless.
This is basically the only way I make seitan these days. I always use the baking method, the cutlets come out soooo good. Sometimes I'll marinade them after baking, then throw them on the Foreman grill for a few minutes, but usually I just glaze in a pomegranate barbecue sauce and put them back in the oven for a few minutes. These are seriously amazing cutlets. Thanks so much!
THANK YOU so much for explaining how to give my seitan a better texture. It was a little more involved but didn't take that long and made such a difference in texture. Super helpful. I baked mine too, I found that to be pretty quick and easy and it turned out great.
Okay, I know my posted picture looks like squished old man balls, but it was my first time making seitan. And it tastes SO GOOD! So, that makes up for the appearance, right???? I wanted to bake it, because it sounded the quickest and easiest. I used a teaspoon of savory instead of the sumac, and these things taste like heaven. I'll have to cover them in gravy or something to disguise their wrinkled nature, but it's worth it. I ate half of the cutlets as I was making them. Good sign!
Has anyone tried to freeze the baked cutlets? Any ideas? I'd love to make a ton of it and freeze it. I need to try simmering it next.
hahahahahaha!
Okay, I know my posted picture looks like squished old man balls, but it was my first time making seitan. And it tastes SO GOOD! So, that makes up for the appearance, right???? I wanted to bake it, because it sounded the quickest and easiest. I used a teaspoon of savory instead of the sumac, and these things taste like heaven. I'll have to cover them in gravy or something to disguise their wrinkled nature, but it's worth it. I ate half of the cutlets as I was making them. Good sign!
Has anyone tried to freeze the baked cutlets? Any ideas? I'd love to make a ton of it and freeze it. I need to try simmering it next.
well worth the effort! we'd tried the baking method before, it wasn't for us, but this time we boiled instead--perfect ;)b thanks so much!
Made this tonight using the oven method - perfect results!
This has great tips on making seitan, though I have yet another tip I would like to throw out there, as far as the boiling method is concerned. I have never tried the stretching/rolling/making into a ball method, but it sounds like it would work well. I know that when you make the dough, pull off pieces, form them into cutlets and drop those into simmering water, you mentioned that it makes the seitan dense on the inside, and spongy on the outside. That being said, I do that method quite often, but once they have boiled for an hour, I remove them from the cooking broth, let them cool 10-15 min., then I coat them in a home made breading (flour, cornmeal, garlic powder, nutritional yeast, salt, poultry seasoning) and fry them in a light layer of oil until browned. It eliminates the spongy aspect and makes them like fried chicken. Try it if you never have-it works great! (and even better with gravy :))
Pages